Last summer I picked up some Popsicle molds to make our own (less sugary) Popsicles. Not to mention that Billy is always wanting a 'treat' after dinner and I wanted to make something I could feel good about us having. Well, they were a hit. We had a get together planned with our friends this weekend (Nate & Alisa, and JD & Sadie) whom all have kids (Soren & Jude and Olive & Adelae) and I was in charge of dessert, so Viola Popsicles! I knew the kids would love them. Everyone including the adults loved this treat, I also made sure to pick up some molds for my friends to make their own with the kids, and from what I was told that is the first thing Soren wanted to do the following morning, YAY! These are easy and you should try your own creations, our friend Brittany said she pours flavored yogurt into hers for her kids-great idea! Enjoy!
-Chocolate Almond Butter Popsicles- (this recipe comes from Elana's Pantry)
2 banana's
1/4 c. almond butter
1/4 c. water (I used 1/2 water)
2 T. cacao powder (raw chocolate)
1 T. vanilla
1/4 t. stevia (I used 1 T. agave)
1. All the ingredients go into your vita mix or blender (I used a blender). Mix well and chill in the fridge for about an hour, then pour into molds and freeze. Freeze until ready.
-Sour Orange Popsicles-
3/4 c. fresh squeezed orange juice (I used my juicer, I needed 2 oranges)
3/4 c. fresh grapefruit juice (again I used the juicer, needed 2 grapefruit)
1 c. Whole Foods Blood Orange Soda
1/4. c. fresh lime juice
1/4 c. agave
1. Mix all the ingredients in a bowl and chill in the fridge for about an hour, then pour mixture into molds and freeze. Freeze until ready.
-Watermelon Lime Popsicles- (I made these for our week of juice fasting)
2 1/2 c. fresh watermelon juice (I used my juicer)
1/2 c. fresh lime juice (used my juicer)
1. Mix these two ingredients together and chill in the fridge for about an hour, then pour into molds and freeze. Freeze until ready.
Showing posts with label DIY. Show all posts
Monday, July 18, 2011
Monday, July 11, 2011
Sweet and Sour Cucumber and Red Onion Pickles
I love pickled anything! When I was a kid I used to drink the pickle juice straight from the jar, I don't partake in that practice anymore but the love for pickled anything still remains. Last summer I pickled radishes and beets, this summer I started with this recipe for sweet and sour cucumbers I found in the July issue of Sunset Magazine. They also have a few other recipes for pickled carrots, green beans and jicama I might just have to try out. But for now, try these yummy cucumbers. Enjoy!
All the goods, time to get started!
I love this picture! Those cucumbers are swimming in pickled goodness.
This is what I used my cucumbers on. Salmon cakes over greens topped w/ the sweet and sour cucumber and red onion pickles.
-Sweet and Sour Cucumber and Red Onion Pickles-
1 1b. Persian or English cucumbers, ends trimmed (I used Wyomatoe cucumbers)
1/2 medium red onion, halved lengthwise (I used two small purple onions I got at the Farmer's Market)
1 stalk fresh lemongrass
1/2 sugar (next time I make these I may use less sugar, I like a more sour brine)
2 tsp. sea salt (I like grey Celtic salt)
1 tsp. freshly ground coriander seeds
1/8 tsp. pepper
3/4 c. Champagne vinegar (I used apple cider vinegar)
1. Slice cucumber and onion very thinly on a mandoline or w/ a knife, rinse onion and drain. Put both in a medium bowl. Peel tough outer layer from lemongrass and smash core with the meat mallet or back of a small heavy saucepan until flattened. Mince core and add to bowl. (I used the back of my knife and just tossed the whole stalk into the bowl)
2. Whisk sugar, salt, coriander, pepper, and vinegar together. Pour over cucumber mixture and chill at least an hour, stirring gently a couple of times. serve cold. Keeps chilled up to a day.
Wednesday, July 6, 2011
Sun Tea- Cosmo Hippie Chef Alert!
When I was a kid my parents would make sun tea in the back yard during the summer. I'm not sure why I loved seeing that ice tea decanter sitting in the sun, but I just thought is was neat. So now that I have my own backyard it's time to make sun tea! It is easy, the sun does all the work and it is cool and refreshing on a hot day. Plus you can make whatever flavor of tea you like. Enjoy!
-Sun Tea-
Glass decanter
7 tea bags, your choice (I used Plum Berry green tea)
handful of mint (I used lemon balm, Thanks Erin Bean)
14 c. water (that is what my decanter holds)
hot sunny day
1. Start by putting the mint in the bottom of the decanter and muddle just a bit w/ a wooden spoon.
2. Next add in the tea bags and water, place the lid tightly on the decanter.
3. Then place the water, tea and mint filled jar somewhere in your yard where it will get the most sun all day, leave it out all day.
4. At the end of the day bring it in and let cool just a bit and then place the jar in the fridge to chill.
5. Serve when cold.
-Sun Tea-
Glass decanter
7 tea bags, your choice (I used Plum Berry green tea)
handful of mint (I used lemon balm, Thanks Erin Bean)
14 c. water (that is what my decanter holds)
hot sunny day
1. Start by putting the mint in the bottom of the decanter and muddle just a bit w/ a wooden spoon.
2. Next add in the tea bags and water, place the lid tightly on the decanter.
3. Then place the water, tea and mint filled jar somewhere in your yard where it will get the most sun all day, leave it out all day.
4. At the end of the day bring it in and let cool just a bit and then place the jar in the fridge to chill.
5. Serve when cold.
Monday, June 27, 2011
Pizza on the Grill- A Summer Favorite!
I can't believe it has taken me a week to updates last weeks meals. Blame it on summer, it's just so busy!
I got my charcoal grill nice and hot! Onions were up first, then I brought them in the house and chopped them up and tossed them in a bowl in anticipation of the other veggies.
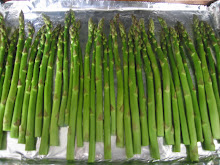
Next: grill the asparagus! (fresh from the farmer's market)
Next: grill the oyster mushrooms and the baby shitake's. (fresh from the farmer's market)
All the grilled veggies chopped up with a Wyomatoes tomato and some fresh basil.
Grill the prepared pizza dough (I picked it up from Whole Foods), just 1-2 minutes each side. Keep an eye on it!
Top the grilled pizza dough w/ DIY Pizza Sauce (recipe is on the blog), then the grilled veggie mix.
Next: Beehive 'Fresh' Cheese, then I slide the whole pizza w/ the foil underneath back on the grill. Put the lid to the grill on the grill just long enough for the cheese to melt. I usually have Billy help me pull the pizza of the grill and back on the cookie sheet.
Take the pizza back in the house and slice it up. Doesn't this look amazing?!
Here's Master William enjoying one of his favorite summer meals. He's my biggest food fan.
Subscribe to:
Posts (Atom)